Saturday, December 19, 2009

NL Etsy Shop Feature: Urve

Is it even possible to overestimate how busy the Christmas/Holiday season will be? It seems as though the year flows in spurts of busyness and extra-busyness. I had hoped to be posting my NL-Etsy seller features much more consistently. Alas, life has rushed in and filled my days (and nights). I am extra thankful for my coffee maker and thankful that Handy Manny finds his way into our home to entertain a very active 5 month old. It seems the world is full of last minute shopper’s, much like myself, because I’ve been busy pumping out some orders and working very hard to get them to their destinations by Christmas. I don’t know if it’s possible for anything to arrive on time at this point.

I’d like to take a short moment to voice my frustration with our dominant postal service, Canada Post. AHHHHHHHHHHHHHHH! There. Is it really necessary to have two ridiculous extremes in posting letters/packages? Please, don’t get me wrong, I greatly appreciate all of the loyal workers who get an item from one location to another, but, I’m really annoyed with the cost of getting anything anywhere faster than regular post. Consider this, if I wanted to send something fast to the US with a tracking number, it would cost over $50 Canadian!! No matter how tiny I can manage to package it. I feel slightly crippled by the lack of shipping options provided to me.


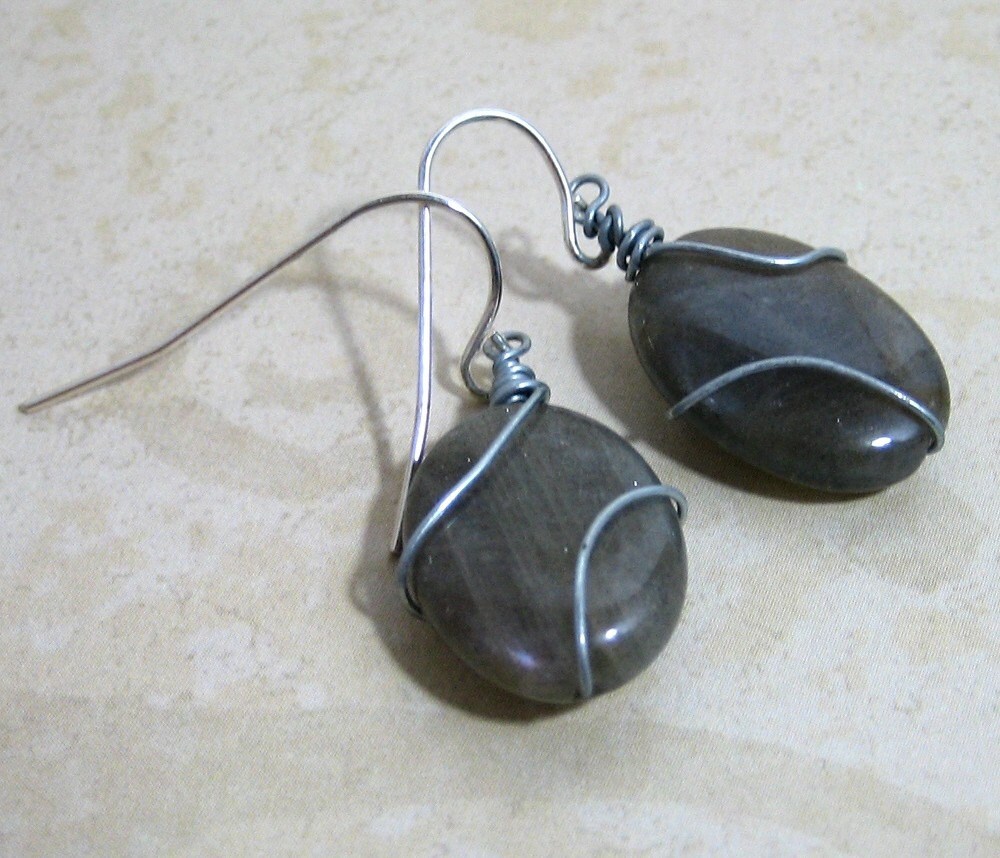
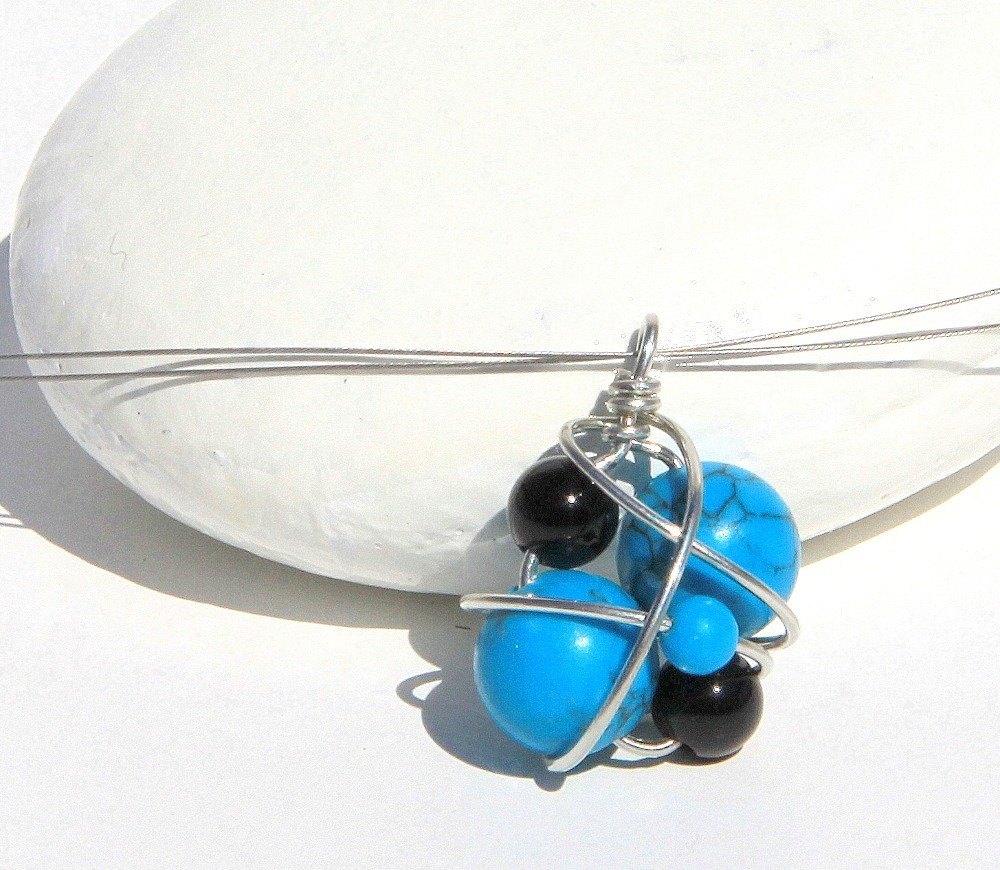
Onto the beautiful art created by this particular featured seller.

Want something truly unique and delicately beautiful, and with prices ranging from $65 to $5,200, urve.etsy.com is the place to go.

URVE - http://www.urve.etsy.com


I grew up without a television-- my parents preferred that we draw or read or practice musical instruments or GET OUT OF THE HOUSE when we drove them nuts (which was quite often, I have three brothers, and we are rather close in age). This meant that we were always busy making things; creating of some sort has always been a part of our lives.


My grandparents on my mother's side came from a small island, where fishing and farming were the mainstays; my grandfather made wooden beer steins, butter dishes, bentwood jewellery boxes, baskets woven from juniper roots, chests for food and clothing storage and my grandmother knit intricate patterns, wove colourful traditional woollen cloth, embroidered beautiful patterns for shirts, blouses, table cloths, etc. On my father's side, my grandparents came from an urban area, and they were writers and my grandfather was a painter. Lots of culture handed down in one fell swoop of genetics!


I have been working with glass for close to 20 years; I started with leaded glass, and continue to love this medium-- the panels are like paintings that are ever-changing, influenced by the changing light behind them, different glass pieces in each light up and sparkle, coming to the fore when struck by the light in certain ways.
Fused glass is newer to me, again mostly self-taught; it opens up different dimensions, and allows me to create smaller functional pieces of art.


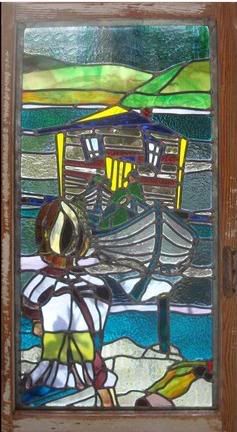
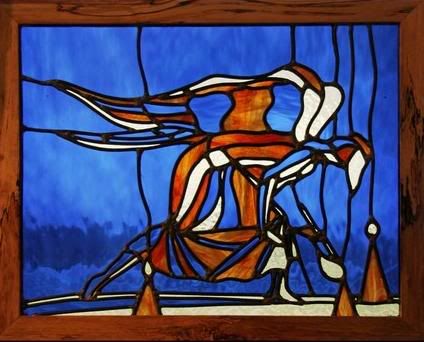
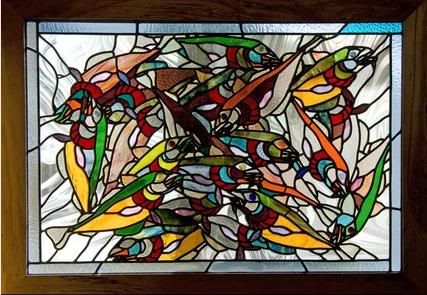
I am inspired very much by the natural world; I live on a hillside in the woods with a view of the Blow-me-Down mountain range across the Bay. The sun comes up behind me, lighting up the snowy wise old mountains in front of me first, and sets behind them at the end of the day. Can't beat the view!! I also get inspired by stories that I hear; Unsettling [see above photo], for instance, is about the resettlement program, and in this panel, you can see a house being towed across the bay by three dories, watched by a young girl on the shore. In Net Worth [see below photo], a mess of cod fish on the docks after a good haul at sea (you are what you catch, after all) is something that people say they remember seeing... not so common anymore.


I love the versatility and the challenge of working with glass, and am looking forward to experimenting and tying this in with metal and wood. At some point, I want to be making large sculptures with combinations of these materials... slowly slowly, things evolve!


Marketing my work happens mostly through word of mouth. I have a blog, www.astonesthrowglass.blogspot.com, which helps a bit, but it is more personal than business-oriented. My new website, www.astonesthrowglass.ca, is up and running, and hopefully it will help to spread the word. Of course, I have a shop on etsy, urve.etsyshop.com, and I also have pieces at the Devon House in St. John's, as well as the Red Ochre Gallery in St. John's. Throughout the summer months, I have some of my work in a variety of shops across the island, as well as in my studio.


This spring, I will have an exhibition of a large installation, Salmon Run, at the Devon House Gallery in St. John's running May9th to June 13th. It is going to be a lot of work to get this on the go, and I am in the thick of it now!


I have travelled a lot in my life, and still have the bug-- the world still awaits, as does this province! Every year, my husband and I try to get to communities that we have not been to in Newfoundland, and realise that we could be travelling here for the rest of our lives and not see it all!


Monday, December 14, 2009

NL Etsy Shop Feature: MayberryCreations

Mayberry Creation’s is another beautiful Newfoundland based business selling on etsy. Who specializes in crocheted hats, and often lists other crocheted items, but the artist isn’t limited to working with just Yarn. Mayberry Creation’s also has listed a number of items made from up cycled materials. Her hats are particularly creative with many unique and whimsical designs. Her shop boasts that she’s a fan of receiving custom orders, her skill is apparent by the items listed, don’t see what you’re looking for? Send her a convo and see if she’s up to the challenge.


Please tell my readers something about yourself, where you grew up, where you’re living now, affiliations, personal stuff.
I was born, raised and currently living in St. John's, Newfoundland. I love it here; the rocks, the sky, the ocean...it's everything that encompasses home to me. I'm 35, work part-time and craft part-time (for profit; I craft all the time for pleasure!). My husband and I have been married 15 years and have three children. My children are wonderfully, individually creative, artistic, dramatic and, most of all, weird! :)

How long have you been creating?

As long as I can remember. I learned to sew in elementary school from my mother and Home Ec classes. I learned to knit around the same time. I started crocheting about six or seven years ago, and it's quickly become my favourite. I learned to needlefelt about two years ago, and also love to recycle thrift-store finds into new and wonderful creations.

How long have you been selling on etsy?

Only about a year.

Do you sell anywhere besides etsy? Where? How long have you been selling via that venue?

I've sold in local shops for the past four-to-five years. The past two years I've been selling at the St. John's Farmers Market (SJFM) every week (in season six months a year). I also do all sorts of craft fairs and events, and am part of MAAP, a support group of artists and crafters.

What inspires you to create? Where do you get motivation?

My biggest motivation is what I see around me; the natural beauty of Newfoundland, the textures and colours found all over. I also am inspired by simpler things, such as how two colours or textures interact. And, of course, by my children. I started making animal hats when my son was about five; he'd draw a picture of an animal and I'd turn it into a hat. I also try to create things I think my fashion-forward daughters would like; they each have such different styles!

Please describe your creative process how, when, materials, etc.

Oh my, where to start! I love textiles; yarn, fabric, wool roving, felt. I can start with an idea of the finished product, or I can start with the materials and see where it takes me. I craft at home; my living room and dining room are my studio and craft room :)

Do you feel like you’ve been affected/influenced by the Newfoundland culture in your chosen art?

Yes, I really do. I am truly bound to this place, and it affects me in all sorts of ways. I love the colours in the ocean; those blues are a huge influence for me. And the juxtaposition of jagged rocks, crashing surf and green spaces. I love to take traditional materials (such as ragg wool) and use them in new and unusual ways.

What other activities occupy your time?

My crafts are my hobbies :) I also spend time volunteering with the SJFM and surfing online. There's also home and household responsibilities!

If you could recommend one book, one television program, one movie, one song what would they be?

Can't really name one of anything...I love Shanneyganock, the Navigators, Great Big Sea...all sorts of traditional and modern Newfoundland musicians. As for TV, I love geek-TV; documentaries and true crime. Movies and books? Harry Potter!

If you could travel anywhere, where would you go and why?

Norway and Ireland, preferably on a cruise. I really wish to see the land where so many Newfoundlanders hail from; to compare, as the song says; the green of the shamrock to the green of the pine. And I've seen several documentaries on Reykjavik and my middle daughter and I are captivated by the city. Of course, the kids want to visit Europe; see London and Paris, so I'd also love to take them there!

What methods do you use to advertise or promote your products? Facebook and Kijiji, mostly. I find that the SJFM and the craft fairs I attend bring large crowds and people have started looking for me :) that's so exciting!


Thursday, December 10, 2009

NL Etsy Shop Feature: OPdesigns.etsy.com

OPdesign’s is a Newfoundland based Jewellery shop, with prices ranging from $10 - $40 US. A little something for everyone, the delicate, the classic and the fun. This seller isn’t a one-craft-wonder; she has jewellery using a number of materials. Here’s a little about her business in her words. Enjoy!

Please tell my readers something about yourself, where you grew up, where you’re living now, affiliations, personal stuff.
Well, I am a university student who grew up in Newfoundland, and am living there currently working on an English degree! And what am I planning on doing with said degree? I know I can't do much with just a BA in English, but the plan is to do grad school eventually.

How long have you been creating?
I have been creating jewelery, along with some dabbling in other crafts for about 15 years. I got a jewelery DIY kit as a gift once as a kid and never looked back! I love every moment I'm creating.
How long have you been selling on Etsy?
I've only been selling for about 7 months. I finally got the nerve to try selling once a couple of friends of mine told me I'd be able to sell what I make no problem, then I was directed to Etsy, and I set up shop.

Do you sell anywhere besides etsy? Where? How long have you been selling via that venue?
I don't really sell anywhere else. Since I'm generally new at selling (and still at school) I've stuck to Etsy and a few live craft sales.

What inspires you to create? Where do you get motivation?


Hmm, interesting! I guess inspiration comes from anywhere and everywhere, but I find my best motivation comes from buying new supplies, as well as playing around with my materials to see if I can come up with something interesting.

Please describe your creative process how, when, materials, etc.
I can only make jewelery when I have loads of free time on my hands and know I won't be interrupted for long periods. Sometimes I can take a good 3 or 4 hours to make something without realizing the time going by!

When I do create though, I wash my hands, open my big black bag of supplies, get settled in my studio (i.e. a large table in my room :) and go to work! I love working with wire and stone beads, so I have several pairs of wire pliers, and lots of those sectioned plastic craft boxes full of beads. I also love using polymer clay, so I have a few clay tools, many shades of clay, and many many rejected clay beads floating around those containers. However, whatever I'm making, I always listen to music. The current fave is Christmas music.

Do you feel like you’ve been affected/influenced by the Newfoundland culture in your chosen art?
I've certainly been affected by the Newfoundland culture! It's almost hard not to be while living here! Although my pieces on Etsy don't scream "Newfoundland" I try to buy local materials when possible, and I especially love using labradorite in my jewelry.


I've actually been experimenting with making clay puffins and town houses, which may or may not end up in my shop. It'll depend on how well they turn out!

What other activities occupy your time?
I love reading, writing, (hence the English degree) playing video games and D&D, and watching anime (I am a huge dork, by the way :).

If you could recommend one book, one television program, one movie, one song what would they be?
One of each?


Hmm, I don't know if I can recommend only one book, but I'll go with "Life of Pi". It's beautifully written, and it's one of those books that makes you think a lot about your outlook on life -- something I love in a book.

As far as TV goes, I don't watch much, but I'm a huge Joss Whedon fan. I just finished "Firefly"; it's a great show with lots of sci-fi elements (again with the dorkiness).


It'll be hard to choose one movie too, but I'll go with "A Clockwork Orange". I have not yet had the chance to read the book, but the movie is fantastic, making you think about life again. Very disturbing though.


Finally, one of my favourite songs is "The Boxer" by Simon and Garfunkel. The music flows beautifully and it recounts a story of vulnerability that I find very touching.

If you could travel anywhere, where would you go and why?
I would love to see Europe just so I could see the castles! That, and of course to see the various famous monuments, and generally get to see other cultures. I would also love to see Japan. There is so much amazing culture and history in Japan, so it's a very close second.

What methods do you use to advertise or promote your products?
Being a student with little money for advertising, I've relied on various social networking sites like twitter and Facebook. I also have a blog, I've made my own business cards, and I give my jewelry as gifts frequently.


I guess that's it! Thanks!


Here are OPdesign’s blog and Facebook group


I'll be HOME for Christmas


My blog title is an attempt to keep up with the Christmas song theme, while introducing a new series of blog posts.

My family and I reside in a small province in Canada, called Newfoundland. Newfoundland has a rich history, especially for such a small area. The province was discovered by Vikings, inhabited by the Beothuks , settled by English fishermen, we were a colony of England, Brittan and the United Kingdom, and from 1907 till 1949 we were self-governing.


We have our own pony (The Newfoundland Pony) and our own dog breeds (The Newfoundland Dog and the Labrador Retriever). Newfoundland also has its own time zone. We have a current population of just over 500,000, but many dispersed individuals working in other places across Canada, or the world who call Newfoundland home.


Can’t think of anything to really compare Newfoundland to? Having a hard time imagining it? Think of Ireland, NL has a large number of individuals who’re of Irish descent, and a lot of the culture came with them. It lives predominately in the smaller rural communities, where lively hood and settlement depended on fishing. But the heart of the Irish-Newfoundland lives in the hidden gems of the cities and larger communities. Hidden slightly by particular cultural developments, our world has gotten smaller culturally, and so has our province. Interestingly you can find all spectrums of our beautiful province in the artisans who keep the older culture alive, while there are many others who continue the path into the future with more trendy crafts. One thing is certain, Newfoundland and it’s people are creative.


It may be one of the smallest geologically represented areas on Etsy, NL may have a large number of crafters, but only a few have found their way onto etsy. I’ll be featuring a few of them here the next few days. Curious? Check out Etsy Geolocater and type in Newfoundland.


Tuesday, December 8, 2009

Last Christmas I gave you my Heart

Sadly, a week has gone by. I was on such a good roll with adding new posts. The Christmas season is always a very busy one for my family, and in our home it starts early, add to that the emotions of a teething baby, and I guess my reasons for going a week without posting are good ones.

.

I’ve nearly finished all of my Christmas shopping, and have a few other things to add. I also have to get photos of the baby done to add to the Christmas cards this year. I’m not big on the whole Christmas card sending/receiving trend, it’s very much an expectation that people fulfill their obligation to this trend, especially when they have an infant and people want to see pictures of him. My argument is along the lines of, what to do with all of the cards (I do keep many, and I always keep any pictures that may come), and the expense of the cards/postage which could go to better places. I can’t help but think of all of the paper used for the mass production of holiday cards. Don’t get me wrong, I really enjoy handmade cards, and I always keep them. I also enjoy cards that are a little 3-D or have beautiful details. I try to recycle the card stock in the cards we get whenever I can. I used this idea from Martha Stewart one year;

Holiday Card Ornaments

This was a beautiful craft, and a great way to up cycle, but for someone without a circle cutter, it’s a little labour intensive. I’m really hoping to get the Marta Stewart Circle Cutter sometime soon. I found it at a Wal-Mart near me, and didn’t buy it. I now regret it and haven’t seen one since.

.

Here’s another twist on the same concept; Click and Print Ornaments, instead of printing all of them, just print them as templates and them use Christmas cards to make them.

.

Here’s another idea that would work nicely and it’s a great craft for kids, How-To; Recycled Ornaments


.

Now, for another use for your letter stencils. I printed the entire alphabet, because I knew I’d use it. I did have something in mind for it. Here’s a little something I’m making for my son. It’s a total of 18”x18” and I’m planning on making it into a large cushion. It was quite labour intensive getting the letters spaced properly, and lined up. So I’ve kind of abandoned it for a few weeks. I hope to finish it by Christmas.

.

Here's my tool caddy. It makes getting all of little tools around the house easier, the wooden tray was just $1.


I cut the entire alphabet from red, orange, turquoise and pale blue felt. Then I mapped out where they should go on the front of the pillow. To do this I traced all the letters on the back, but this wasn't an overly effective method for spacing the letters. It did work as a general guide, but my eye was really what I relied on.
.
.
Each letter is hand stitched with the same colour thread, I already had these colours in my supplies, so I had no added expense in creating this. I love the way the colours work together, and I think they're spaced well, it looks clean and I really hope Benjamin will enjoy it for a long time (once I finish it).
.
.
I hope everyone's enjoying their holiday prep!
...
By the way: Can anyone tell me WHY blogger/blogspot doesn't allow me to space my paragraphs? Is there something messed up in my formatting? In order to get spaces I have to add some sort of character between the paragraphs. I'm annoyed with this. Help?

Monday, November 30, 2009

Deck the Halls

Really enjoying Reliant K's Christmas CD!

Here’s a better shot of my tree than the one I posted before, I’m really loving it (it’s ok if it’s not your style, we used to be the types to have a VERY traditional tree, but I wanted to try something different).

I’ve made a nice few things to put on this tree, to cut down on the cost of having to buy a lot of new decorations. If you notice there’s green and blue circles in a sort of garland on the tree (I need to make more of this). I’m going to post a few pictures on how to make this, very easy, very economical.

I’ve used the same method to make some Christmas themed banners, and since I needed to make one, the tutorial is based on the making of these banners. The circle garland is made the exact same way.

.

Today’s tutorial, making ‘garland/banners’

.

Here are the tools you'd need. Here I'm making a banner that read's Merry Christmas. I created my own stencils on the computer and printed them onto card stock. If you don't have card stock, then simply print them on regular paper and then glue onto an old greeting card (or two) and then cut it out. If you can't seem to find a font on your computer that you love, try going to dafont.com and check out some of the fantastic free fonts they have there. To make circle garland, or any shape at all, just make the shape stencil you require. For my circles I used four different sizes.

.

I'm also using felt, ribbon, white glue, scissors, and a good pen.


Once you've cut out your letters, trace their shapes onto your felt. It's best to turn each letter over, this way the ink of your pen will be on the back of the letter you create. This way you won't have tell-tale ink marks on the outside of your banner/garland.
To conserve felt place your stencils close together, trace all the letters you need. Here the letters for Merry Christmas didn't even use a full sheet of felt (I can buy felt for 2-3 sheets for $1!).

Cut out each letter, if you intend to have other projects you may want to keep any of the scraps. I use them for things like pin cushions, or anything that needs some extra stuffing/filler.

I keep all scraps and bits in a plastic bag. The fuller this bag gets, the more excited I get, I've got lots of plans for the scraps in there.


Take your ribbon, and line it across a table or other smooth surface. I then take my letters/circles and space them just below the ribbon so I can easily place them on the ribbon once I've added the glue.

I use a small amount of glue along the ribbon and then place the letter on top of it. I press down just gently. The glue will grab the felt without too much pressure. If you add too much glue then the felt will just absorb it.

Once you've added all your felt pieces to the ribbon, give it a few hours to dry. Don't worry too much about getting the water soluble glue on the table top, it washes right off. And the felt/ribbon won't stick to your table/smooth surface either. Instead of using glue you can hand stitch the letters to the ribbon, it will be more durable, but it's much more time consuming. You could run the letters through a sewing machine if you'd like, but I don't really feel it gives such a need appearance.
.
There are a number of Etsy sellers selling garland that's sewn, very similar to my felt circle garland, it does look nice, but for the purposes of hanging it on a tree, I was weary that the threads would tangle in the prickly branches. Obviously, use whichever method you think would best suit you.
.
Here's one all dry and hanging in my entry.
I made another one, similar to decorate my fire place. We don't actually have 'fire' in our fireplace, so it's perfectly safe.

Another use for this craft would be to add a name to a door. Here's my son's bedroom door. I hand stitched this particular one since It will see more use then a few Christmases.

Saturday, November 28, 2009

Candy Cane and Almond Biscotti

So, as I had promised here are some shots of making the Candy Cane Biscotti, and since I was going to make bowls and things dirty anyway, I figured I'd double the recipe and make some almond biscotti as well.

As I mentioned before, the best way to crush the candy canes, is with a clean hammer, and on a wooden or plastic chopping board. Hammer them with the plastic left on, or else shatters of candy will fly everywhere. Unwrap the crushed candy over a bowl, and discard the wrappers.

I don't get too picky about the size of the candy pieces, some end up like a fine powder, and others are around a centimeter long. The powder will help flavour the biscotti dough, and the larger pieces will add larger bursts of peppermint flavour.


Here's how the Candy Cane biscotti looked when it was finished baking.


For the almond biscotti, I simply chopped almonds (which I bought already 'sliced' because they were the cheapest ones I found at the grocery store) and added 1/2 tsp of almond extract to the mixture. The almond extract isn't necessary, but I had it in my baking supplies so I added it.
Once the two batches of biscotti were baked and cooled, I melted some white chocolate, used a butter knife to spread it along the bottom edge of the biscotti pieces and then I sprinkled on extra Candy Cane pieces. I did the same for the Almond biscotti, but instead of sprinkling on the almonds, I dipped the end in a little mound of them. I was very pleased with how these finishing touches turned out.


Other ways to garnish your biscotti? A fast method for adding chocolate to biscotti once it's baked would be to line the biscotti up on waxed paper, and then drizzle melted chocolate over them. Try drizzling white chocolate first and then adding milk chocolate afterwards. Or, try dipping the entire end of a biscotti piece into a deep bowl of melted chocolate, this might be a great idea for anyone with a big sweet tooth.
Hope you enjoyed my biscotti 'how-to'.
Tomorrow, another Christmas decoration how-to post.

"TransParent”

Whoever coined the cliché; ‘Blood is thicker than Water’ in terms of relationship was wrong. Physically, in consideration of scientific principals, yes it’s a fact that blood is thicker in consistency than water is. The cliché refers to relationships, to family primarily; apparently it first appeared in 1670 as a Scottish Proverb (source), and in the context of relationship, it is wrong.

.

This may be the most transparent I’ve ever been and will ever be to complete strangers, the vast world beyond my inner sanctum of acquaintances and friends of old. It is quite possibly the most transparent I will ever be here in this blog, or with the vastness which is the random reader who may lurk or pass by unknown. I’m not sure what is propelling this; it may be the inability to sleep, induced by the large amounts of coffee I drank. Maybe it is some desire to let the world know, that I’m okay. It must be said, it must be known; that blood is not thicker than water in my heart.

.

Confused? Please let me enlighten you with some background information.

.

I am a 26 year old female, who was lovingly raised by her grandparents, who were truly and wholly parents to her. With a birth mother who gave her some of the greatest gifts she could ask for: life, as well as a life she herself could not provide (by allowing someone else to raise her daughter). I’m forever grateful for that. Here’s the hard fast cold fact by which this post surrounds itself; I’ve never met my father, nor have I had any significant contact with his immediate or extended family. (Please don’t pity me, continue reading instead).

.

As a child, this did bother me some. I knew there was more, some rejection that lurked and tried to hurt me. I suppose the world is always big and scary and with lots of sharp edges to a child. Where everything that is not loving in nature, is harsh in nature. I was more confused by my situation then tormented; it was lack of knowledge and not blood relation that worried me.

.

As a teenager, when the entire world is dramatic and bold, the situation seemed somewhat dramatic and bold. I don’t know what it was; over whelming emotion would be my best guess. I never wanted anything, never asked for anything and never wanted to seek anything from those blood relations, whoever they were. I think it was more the knowledge that they were not a part of my life that creeped in at the corners of recognition, played on my mind and hid in the shadows from time to time. I suppose the illusion of rejection is stark for a teenager, any teenager.

.

As my teenage years progressed into adult hood, even before graduating High School, I knew that the quote about blood and water was a farce, a rude lie. I had already lived a vivid and full life. I knew the true definition of family wasn’t defined by blood lines on some family tree. Family in its truest and most beautiful form wasn’t born from blood obligation, a sense of responsibility. Family was born of love, of the decision to stand by someone and stand with them. My family spans a large number of people I know that I can depend on, some have been in my ‘family’ for a season (even if they are not in my life now, I will always love them and will come running to their aid if they call), but others are there true and fast, and they’ll be there till the end of time. They are the kind eyes that listen, the hands the help, the words spoken that are true enough to stand on. Family are people you can turn to at any time.

Sure, I do think of those blood relations from time to time, like when I graduated High School or when I got married, and once in a while now that I have a son. Is there a place in my heart for them? Sure. Are those blood relations family? No. Am I bothered by that? No. I have all the family I need, and my heart feels full.

.

My point is, I’m not bitter, and never was. I’m not hurt nor do I feel rejected or broken. I’m not wounded, nor do I need to be pitied. I am happy, my life is full, and my family is perfect. If any of you, friends (old or new) have ever worried about this, please don’t. There’s no need to whisper about this in secret as if some injustice or crime has been committed against me, I am happy, I am well. I pray that whoever they are, wherever they are, that they are happy and well too. I have all I need, water may not be all that thick, but love sure is.

Friday, November 27, 2009

Perfect Biscotti for the Biscotti Newbie’s

Many friends of mine on Facebook were curious about making the Candy Cane biscotti that I had made a few weeks ago. I decided that for those who’ve never made Biscotti before and may be a little nervous about following a recipe and not knowing exactly how each step should look, that I’d create a little baking tutorial. I’ve been a fan of a recipe that I found on Culinary in the Desert. I use this recipe for most of the biscotti I make, although I always alter it a little. The recipe is called Easter Biscotti and uses Jelly Beans. It’s very simple to substitute almost anything you wish for the Jelly beans. Today I made it with chopped red and green M&M’s, chopped almonds, and some chocolate chips thrown in as well (why? Because these are the items I had on hand, seriously, you can use most anything that’s yummy).


One great thing about this recipe, is that you probably have all of these ingredients already in your home.


“Easter Biscotti” (as shown on Culinary in the Desert, with some of my additions)

Ingredients


3 cups all-purpose flour
2 teaspoons baking powder
1/2 teaspoon salt
4 tablespoons unsalted butter, softened [¼ cup]
1 cup sugar
4 large eggs, divided - at room temperature
2 teaspoons vanilla
12 ounces Jelly Beans [or
whatever your sweet tooth is craving]

Preheat the oven to 375°
[Here I deviate from the recipe and heat my oven to 350-ish instead.]


In a medium bowl, sift together flour, baking powder and salt.

In a large mixing bowl, cream together butter and sugar until light and fluffy. Add 3 eggs, one at a time, beating until incorporated. Mix in the vanilla.


Add in the flour mixture and mix just until combined.


Using a wooden spoon, stir in the Jelly Beans. The dough may be a bit sticky. [using floured hands to mix in the candy may help]


Scoop dough onto a lightly floured surface [heavily floured helped me more, I brushed off any extra flour afterwards]. Divide the dough into 2 pieces. Take one half and roll lightly back and forth making a log about the length of your baking sheet. Carefully place it on a baking sheet lined with parchment paper. Repeat with the second piece. [Please note, the Parchment paper is CRITICAL, parchment paper shouldn’t be replaced with wax paper, which is less durable in the heat, and will result in a very ‘smoky’ kitchen].

Using wet fingers if the dough is stick, flatten each log a bit. [I kept my hands floured, also just brush away any excess flour from the dough at this point].

In a small bowl, whisk the remaining egg and brush evenly over each log. [Don’t use ALL of the egg, it’s unnecessary, this simply adds a nice shine to the top of your biscotti. Any reserved egg can be refrigerated and used for something else]


Bake for about 23-28 minutes or until they are slightly golden brown. [ I baked for just 15 min, sometimes a little longer. Too long and your biscotti will burn on the bottom, not yummy].


Remove from the oven and let cool for at least 10-15 minutes (can go a little more.) Using a serrated knife, carefully slice them on the diagonal into about 1/2" slices.


Stand each slice back on the baking sheet - it is ok if they touch.


Bake for another 10-12 minutes until the edges turn a slight golden brown. [I reduce the heat here, possibly to 300 and then check on it at 8 min and leave it for a few more in if necessary].

Transfer to wire rack to cool completely. [to further toast the biscotti and make sure the outsides are fairly dry, I turn them on their sides, and put them back in the oven (while it's turned off, but still hot) for another 10 minutes. ]


I haven’t decided if I’ll add any chocolate to the outside of this biscotti, it’s simple and beautiful just as it is, and very tasty.


Making Candy Cane biscotti is the same, with crushed candy cane [to save yourself the pain here, use a wooden or plastic cutting board, keep the candy canes wrapped, and hit with a hammer. Then remove the crushed candy from the wrapper into a bowl. This is the cleanest and most effective method, using a poultry pounder may work as well, and a rolling pin does, but I find a hammer is best]. I then melted chocolate (I used milk because the husband and I like it best, but white would be just as nice), used a butter knife to spread it along the bottom edge of the biscotti and sprinkled candy cane over it. Then simply give the chocolate time to set, in a hurry? Refrigerate it for a minute. And you’re done. Culinary in the desert also has a Candy Cane recipe available if you’d prefer to use that here; Candy Cane Biscotti.


I’d take the time to make some Candy Cane biscotti today and post a few photos, but I’ve run out of sugar and vanilla. I’ll post some tomorrow.


Check out my husband’s blog here; Memory Card

Tuesday, November 24, 2009

Peppermint Happiness

As a family of three, we decided last night to put up our Christmas Tree.

Forgive me for rhyming, but once I had the 'three' in that sentence, I couldn't help myself. To make the experience a little more festive, I made some peppermint lattes, unfortunately the Candy Cane Biscotti I had made a week ago has been devoured. I need to find time to make more.

Here's our tree, it's still not the finished product, but after several years of wanting so badly to decorate with turquoise and green I've finally seen it through. I've a lot of decorations left to make for it, I'll post a much better photo once it really feels complete.
Along with the bulbs covered with yarn I've also made beaded snowflakes. Like the up-cycled bulbs this is also very straight forward. So here's a quick decorating idea/not-so-in-depth-tutorial.
I'm a pack rat, so I didn't need to purchase any new supplies. I happy to have finally put these beads to a second use, I used them a few years ago to make the jewelry for my wedding. Call me cheap, I like it.


Below is a trial necklace I made before switching out the seed beads out for crystal cut glass beads. The reason I've included a shot of this, is because for those who have old beaded necklaces laying around this is a great opportunity to up-cycle those into something new!


here are the supplies I used, some heavy duty floral wire (also left over from my wedding, silver wire may be more suitable, but be sure to buy a good sturdy gauge), scissors (very strong once, since I used them to cut the wire, but a small pair of wire cutting pliers would work wonders in this craft, I have some but couldn't find them), beads and some lighter gauge wire.


Cut a length of wire, however long you would like the diameter of your snowflake to appear, and add an extra few centimeters. Wrap the wire around one bead, to create a stop on one end. fill the wire with beads, keep the beads a little loose on the wire. Wrap the wire at the other end. Create three like this.
Find the center of your wires, and twine the three completed arms of the snowflake together. I used some lighter gauge wire to make sure everything was secure afterwards. If these steps make you nervous, hot glue will work fine to keep the three parts of the snowflake together.

I attached a loop of fishing line to hang it with.

The finished product:

Simple? Yes, very. It's a little time consuming, but very pretty. Another use would be adding it to a gift tag as a decoration/added gift. Extremely cost effective. Happy decorating readers!